In this blog post, we’ll extend the content from the book Developing Extensions for Joomla! 5 by building an editor button plugin. This new button will support the content plugin we wrote in Chapter 8 and will improve the process of adding links to our projects. This will simplify how users insert project links directly from the Joomla! Editor. You’ll learn the steps to set up the plugin, adapt the component to show the layout properly, and integrate JavaScript for seamless project selection. All the required code is provided, along with explanations for each part.
Disclaimer: This blog post expands on the content from the book Developing Extensions for Joomla! 5. However, it has not undergone the same thorough editorial review as the book itself. That said, I have put forth my best efforts and utilized all available tools to maintain the same quality standards as in the book.
Technical requirements
To follow the steps of this blog post, you will require:
- Visual Studio Code (or the code editor of your preference)
- The Joomla! 5 site installed in previous chapters, the book Developing Extensions for Joomla! 5.
You will find all the code used in this chapter in the blog-button-plugin branch of the GitHub repository.
What is our goal of this Blog Post?
In Chapter 8 of the book, we developed a content plugin for our Simple Projects Manager extension, allowing users to easily insert links to specific projects within Joomla! articles. You can find the plugin’s code in the following repository:
Project Links content plugin code
This plugin searches for the shortcode {projectlink ID} in an article and replaces it with the project’s title and a clickable link. While this method is efficient, it can be tedious for users to manually find the project ID each time they want to insert a link. To enhance the user experience, we will explore how adding an editor button can streamline the process of linking to projects directly within Joomla!.
What is an editor button in Joomla!?
Editor buttons are tools that appear in the Joomla! text editor when you click the CMS Content button. They assist users in easily adding content to their site and are particularly useful for inserting shortcodes to integrate features from other extensions. Joomla! 5 comes with some of these buttons out of the box. Joomla! 5 includes several default editor buttons, such as the Media button, the Read More button or the Page Break button.
These buttons are part of the editor-xtd plugin family. You can also create custom editor buttons to further enhance user functionality. In this blog post, we’ll explore how developing a custom editor button can complement and improve the usability of our Project Links content plugin.
Coding the basic structure of our plugin
Our button plugin will use the same user experience as other button plugins in Joomla!. When the user clicks the button, a modal popup will appear listing all the projects to choose the one we want to include.
The structure of an editor button plugin is the same as any other plugins in Joomla!, so we start creating our plugin structure. First, we add the manifest file: src/plugins/editors-xtd/plg_editors-xtd_projectlinkbutton/projectlinkbutton.xml
<?xml version="1.0" encoding="UTF-8"?> <extension type="plugin" group="content" method="upgrade"> <name>plg_editors-xtd_projectlinkbutton</name> <author>Carlos Cámara</author> <creationDate>2024-09</creationDate> <copyright>(C) 2024 Piedpiper, Inc.</copyright> <license>GNU General Public License version 2 or later; see LICENSE.txt</license> <authorEmail>This email address is being protected from spambots. You need JavaScript enabled to view it. </authorEmail> <authorUrl>https://developingextensionsforjoomla5.com/</authorUrl> <version>1.0.0</version> <description>PLG_EDITORS-XTD_PROJECTLINKBUTTON_XML_DESCRIPTION</description> <namespace path="src">Piedpiper\Plugin\EditorsXtd\ProjectLinkButton</namespace> <files> <folder plugin="projectlinkbutton">services</folder> <folder>src</folder><folder>language</folder> <folder>tmpl</folder> </files> <languages> <language tag="en-GB">language/en-GB/plg_editors-xtd_projectlinkbutton.ini</language> <language tag="en-GB">language/en-GB/plg_editors-xtd_projectlinkbutton.sys.ini</language> </languages> </extension>
In this manifest, we give all the information Joomla! needs to install the plugin on the site.
We define our plugin name as Project Link Button, and we set it to be part of the editors-xtd family.
Next we add the provider for the plugin so we create the file: with the following code
<?php use Joomla\CMS\Extension\PluginInterface; use Joomla\CMS\Plugin\PluginHelper; use Joomla\CMS\Factory; use Joomla\DI\Container; use Joomla\DI\ServiceProviderInterface; use Joomla\Event\DispatcherInterface; use Piedpiper\Plugin\EditorsXtd\ProjectLinkButton\Extension\ProjectLinkButton;\defined('JEXEC') or die;return new class implements ServiceProviderInterface { public function register(Container $container) { $container->set( PluginInterface::class, function (Container $container) { $dispatcher = $container->get(DispatcherInterface::class); $plugin = new ProjectLinkButton( $dispatcher, (array) PluginHelper::getPlugin('editors-xtd', 'projectlinkbutton') ); $plugin->setApplication(Factory::getApplication()); return $plugin; } ); } };
As it is explained in the plugins developed on Chapter 8 of the book, this file sets up the dependency injection for the plugin, and it includes all the services that we need in our plugin.
Finally, we include the extension file. The code for the extension.php file is similar to other simple plugins. We start creating the file with this code:
<?php

namespace Piedpiper\Plugin\EditorsXtd\ProjectLinkButton\Extension;

use Joomla\CMS\Editor\Button\Button;
use Joomla\CMS\Event\Editor\EditorButtonsSetupEvent;
use Joomla\CMS\Language\Text;
use Joomla\CMS\Plugin\CMSPlugin;
use Joomla\CMS\Session\Session;
use Joomla\Event\SubscriberInterface;

\defined('_JEXEC') or die;

/**
 * Editor Article button
 *
 * @since  1.5
 */
final class ProjectLinkButton extends CMSPlugin implements SubscriberInterface
{
    /**
     * Returns an array of events this subscriber will listen to.
     *
     * @return array
     *
     * @since   5.0.0
     */
    public static function getSubscribedEvents(): array
    {
        return ['onEditorButtonsSetup' => 'onEditorButtonsSetup'];
    }
}
In this code, we define the plugin class extending the CMSPlugin class. Then we register the event to include our button using the event onEditorButtonsSetup.
The method we register is onEditorButtonsSetup and in it, we will define our button. So we add this code to our plugin class:
    public function onEditorButtonsSetup(EditorButtonsSetupEvent $event)
    {
        $subject  = $event->getButtonsRegistry();
        $disabled = $event->getDisabledButtons();

        if (\in_array($this->_name, $disabled)) {
            return;
        }

        $this->loadLanguage();

        $button = $this->onDisplay($event->getEditorId());

        if ($button) {
            $subject->add($button);
        }
    }

    public function onDisplay($name)
    {
        $user  = $this->getApplication()->getIdentity();

        $link = 'index.php?option=com_spm&view=projects&layout=modal&tmpl=component'
            . Session::getFormToken() . '=1&editor=' . $name;

        $button = new Button(
            $this->_name,
            [
                'action'  => 'modal',
                'link'    => $link,
                'text'    => Text::_('PLG_EDITORS-XTD_PROJECTLINKBUTTON_INSERT_PROJECT'),
                'icon'    => 'file-add',
                'iconSVG' => '',
                'name' => $this->_type . '_' . $this->_name,
            ]
        );

        return $button;
    }
In this code you can see we define the button in a class in which we set the name of the button and a link. The link is the content that will be shown inside the modal after the user clicks the button. In our case, we set this to the list of projects. Checking carefully at the link, we can see it points to the Projects view of our component com_spm and we add some interesting parameters:
&layout=modal: This will request the layout called modal.php from thetmplfolder. When the layout file does not exist, Joomla! defaults to thedefault.phpfile inside thetmplfolder.&tmpl=component: This is the standard way in Joomla! to show the content of a component without modules or other template structures. Just the component area.Session::getFormToken() . = '1': This PHP code includes a session token to protect our view from CSRF attacks (Check chapter 13 of the book for more details).&editor=' . $name: This adds the name of the editor instance from which the button is called. We need this to know where to insert our content.
We can now zip our plugin and install it and activate it in our site. Then when creating a Joomla! Article we will notice the new button inside our CMS Content button on the editor:
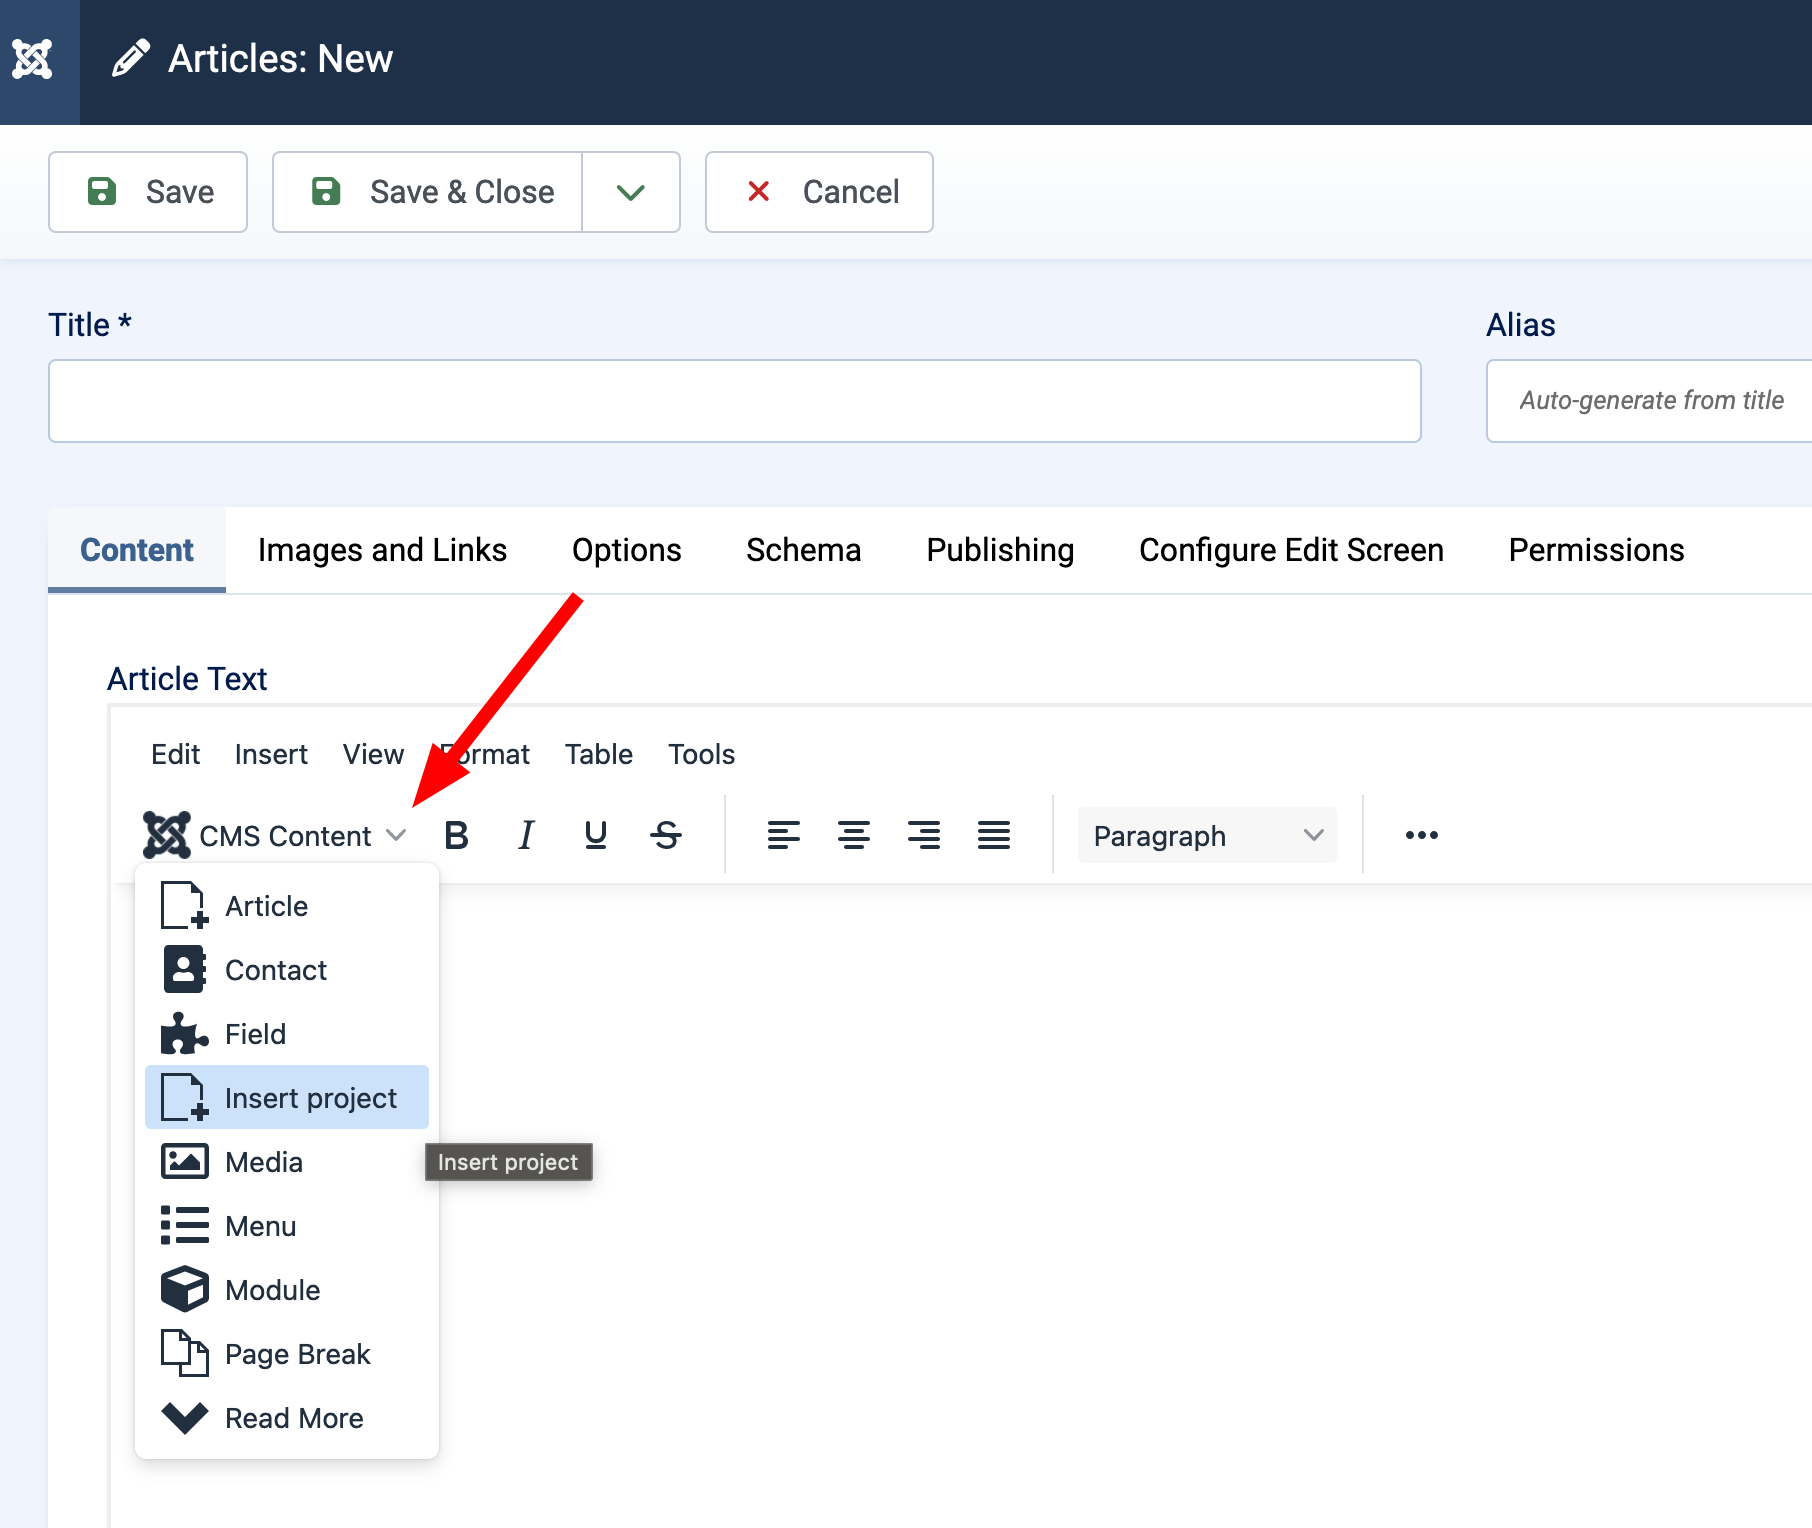
When you click that button, a new modal window will open with the list of projects defined in the component.
Inserting the project in the editor text area
To insert a project into our text editor after clicking on it, we need to include some JavaScript code that performs this action. This code is executed from inside our modal window. So we create the following file into: src/component/media/js/xtd-projectlistbutton.js with the following code:
  const editor = Joomla.getOptions('xtd-projectlinkbutton').editor;
  document.querySelectorAll('.select-button').forEach(element => {
    element.addEventListener('click', event => {
        const id = event.target.getAttribute('data-id');
        const tag = '{projectlink ' + id + '}';
        window.parent.Joomla.editors.instances[editor].replaceSelection(tag);
        window.parent.Joomla.Modal.getCurrent().close();
    });
});
In this code, we first retrieve the editor stored in the Options (we pass this option in the modal.tpl code) inside the Joomla object. Then the code looks for the elements with the CSS class .select-button and attaches a handler for the click event of the elements. This handler gets the project ID from the data-id HTML attribute and creates the short code to include in our text editor. Finally, the code inserts the short code in our instance of the editor. In the last line, we close the modal.
We are opting to include the short code we developed in the Chapter 8: Developing a Joomla! plugin when we developed our content plugin. You may want to include a direct link to the project and avoid using the content plugin. In that case, you need to replace the tag variable with the proper code, and be sure you can retrieve the elements you want to include from the selection. This code will include the project title:
const editor = Joomla.getOptions('xtd-projectlinkbutton').editor;
document.querySelectorAll('.select-button').forEach(element => {
  element.addEventListener('click', event => {
    const name = event.target.innerText;
    const tag = '<span class="project-title">' + name + '</span>';
      window.parent.Joomla.editors.instances[editor].replaceSelection(tag);
      window.parent.Joomla.Modal.getCurrent().close();
  });
});
In this code, we have highlighted the parts that are different. In these lines, we retrieve the visible text inside the <button> tag. Then we include it in a <span> tag and we replace it exactly as before.
To use this javascript file in our component, we have to add it to the joomla.asset.json file, as seen in Chapter 3: Developing the Frontend of a Basic Joomla! Component. So we edit the file src/component/media/joomla.asset.json and we edit it to look like:
{
 "$schema": "https://developer.joomla.org/schemas/json-schema/web_assets.json",
 "name": "com_spm",
 "version": "1.0.0",
 "description": "Simple Project Manager component assets",
 "license": "GPL-2.0-or-later",
 "namespace": "Piedpiper\\component\\Spm",
 "assets": [
  {
     "name": "com_spm.projects",
     "type": "style",
     "uri": "com_spm/projects.css"
   },
   {
     "name": "com_spm.validation",
     "type": "script",
     "uri": "com_spm/validation-scripts.js",
     "attributes": {
       "defer": true
     }
   },
   {
     "name": "com_spm.xtd-projectlinkbutton",
     "type": "script",
     "uri": "com_spm/xtd-projectlinkbutton.js",
     "attributes": {
       "defer": true
     }
   }
 ]
}
We have added the highlighted part of this JSON structure to declare the new JavaScript file inside our component.
Adding the layout of the modal window
With a few lines of code, we show our list of projects. This list allows filtering projects, using the same options as on the main project screen. But, the modal isn’t very useful right now, as clicking on a project doesn’t insert the project data into the editor.
You might also notice that the top and side toolbars appear in the modal, which isn’t great for user experience.
To fix these issues and add the insert functionality, we’ll create a new layout for the project list.
Create the file src/component/admin/tmpl/projects/modal.php with the following content:
<?php \defined('_JEXEC'); use Joomla\CMS\Factory; use Joomla\CMS\Language\Text; use Joomla\CMS\Router\Route; use Joomla\CMS\HTML\HTMLHelper; use Joomla\CMS\Layout\LayoutHelper; $app = Factory::getApplication(); $listOrder = $this->escape($this->state->get('list.ordering')); $listDirn = $this->escape($this->state->get('list.direction'));$editor = $app->getInput()->getCmd('editor', '');
$this->document->addScriptOptions('xtd-projectlinkbutton', ['editor' => $editor]);
$wa = Factory::getApplication()->getDocument()->getWebAssetManager(); $wa->useScript('com_spm.xtd-projectlinkbutton'); ?> <form action="<?php echo Route::_('index.php?option=com_spm&view=projects'); ?>" method="post" name="adminForm" id="adminForm"> <div class="row"> <div class="col-md-12"> <?php echo LayoutHelper::render('joomla.searchtools.default', ['view' => $this]); ?> </div> </div> <div class="table-responsive"> <table class="table table-striped"> <caption><?php echo Text::_('COM_SPM_PROJECTS_LIST');?></caption> <thead> <tr> <td><?php echo Text::_('COM_SPM_PROJECTS_LIST_ID');?></td> <td><?php echo Text::_('COM_SPM_PROJECTS_LIST_NAME');?></td> <td><?php echo Text::_('COM_SPM_PROJECTS_LIST_DEADLINE');?></td> </tr> </thead> <tbody> <?php foreach ($this->items as $item) : ?> <tr> <td><?php echo $item->id; ?></td> <td><button class="select-button btn btn-link btn-sm" type="button" data-id="<?php echo $item->id; ?>"><?php echo $item->name; ?></button></td> <td><?php echo $item->deadline; ?></td> </tr> <?php endforeach;?> </tbody> <tfooter> <?php echo $this->pagination->getListFooter(); ?> </tfooter> </table> </div> <input type="hidden" name="task" value="projects"> <?php echo HTMLHelper::_('form.token'); ?> </form>
This code is like the one we have for the file src/component/admin/tmpl/projects/default.php. You can see we have only changed the bolded parts. Let's see these lines in detail:
$editor = $app->getInput()->getCmd('editor', '');
$this->document->addScriptOptions('xtd-projectlinkbutton', ['editor' => $editor]);
This code retrieves the editor instance from the URL of the modal. Then, it injects it inside the JavaScript Options that Joomla! will include in the page.
$wa = Factory::getApplication()->getDocument()->getWebAssetManager();
$wa->useScript('com_spm.xtd-projectlinkbutton');
This code gets an instance of the Web Asset Manager, as seen in Chapter 3: Developing the Frontend of a Basic Joomla! Component, and instruct it to load the JavaScript file we just included in the component.
<button class="select-button btn btn-primary btn-sm" type="button" data-id="<?php echo $item->id; ?>"><?php echo $item->name; ?></button></codeFinally, we replace the item name with a button to select the items. Notice that we include the project ID inside the HTML5 data attribute data-id, this let use retrieve it easily with the previous JavaScript code. We have also added some bootstrap 5 CSS classes to make it look better.
After creating the layout, we have to edit our Projects List view and remove the toolbars when we are showing the modal layout. To do this we edit the file src/component/admin/src/View/Projects/HtmlView.php, and in the display() method, replace the line:
$this->addToolbar();with this code:
if ($this->getLayout() !== 'modal') {$this->addToolbar();}
The immediate effect of this change is that the Toolbars will disappear in the modal.